-
[Android] 애니메이션으로 앱에 생동감 불어넣기 - Animated Vector DrawableOther/Android 2019. 4. 6. 16:33
평소에 스마트폰을 사용하다 보면 뭔가 신선한 느낌(?)의 앱을 만날 때가 종종 있습니다.
바로 앱의 UI가 깔끔하고 군더더기가 없으며, 부드러운 UI 애니메이션 효과를 보여주는 경우인데요.

개인적으로는 화면을 클릭했을 때 움직임이 적은 앱보다 어느 정도 생동감이 느껴지는 앱이 사용자에게 더 좋은 사용 경험을 제공한다고 믿습니다. 이런 이유로 모바일 애플리케이션에서 애니메이션 효과는 매우 중요하다고 생각합니다.
그래서 본 포스팅 주제로 앱에 생동감을 불어넣는 방법에 대해 적어보겠습니다.
AnimatedVectorDrawable
안드로이드는 5.0(API 21)부터 AnimatedVectorDrawable이라는 클래스를 제공합니다.
이 클래스는 기존에 안드로이드가 제공하던 AnimationDrawable 클래스(이미지들을 연속적으로 보여줌으로써 물체가 움직이는 것처럼 보이게 하는 프레임 애니메이션 방식)와는 다르게 부드러운 움직임의 애니메이션을 쉽게 구현 가능하게 해 줍니다.

Play/Pause 버튼 예시 위의 예시는 AnimationVectorDrawable로 Play/Pause 버튼을 구현한 예시입니다.
본 포스팅에서는 예시와 다르게 음악 플레이어에서 흔히 볼 수 있는 '재생 중' 애니메이션을 구현해 보겠습니다.

구현해 봅시다! 차근차근 따라가 볼까요? 위와 같은 애니메이션을 구현하기 위해서는 다음 세 가지의 xml 파일을 정의해야 합니다.
- Vector Drawable : <vector> 태그가 포함된 xml 파일
- Object Animator : <objectAnimator> 태그가 포함된 xml 파일
- Animated Vector Drawable : <animated-vector> 태그가 포함된 xml 파일
Vector Drawable은 움직일 대상이 되는 그림입니다. 우리의 예제에선 네 개의 분홍색 바가 되겠네요.
우선 바를 한 개만 그려보겠습니다. xml 파일은 res/drawable 경로에 위치해야 합니다.
<!-- res/drawable/play_icon.xml -->
<?xml version="1.0" encoding="utf-8"?>
<vector
    xmlns:android="http://schemas.android.com/apk/res/android"
    android:width="128dp"
    android:height="128dp"
    android:viewportWidth="90"
    android:viewportHeight="50">

    <group android:name="play_icon_first">
    	<!-- 첫번째 바 -->
        <path
            android:name="first"
            android:pathData="M 10,50 L 10,40 L 20,40 L 20,50 Z"
            android:fillColor="@color/colorAccent" />
    </group>
</vector>
주목해야 할 속성은 viewportWidth, viewportHeight 그리고 <path> 태그의 pathData입니다.
viewportWidth와 viewportHeight는 벡터 이미지가 그려질 공간의 전체 너비와 높이를 의미합니다.
그림을 그리는 화가의 입장에 비유해보면 캔버스의 크기가 되겠네요. 전 90 x 50 크기의 캔버스를 선택했습니다.
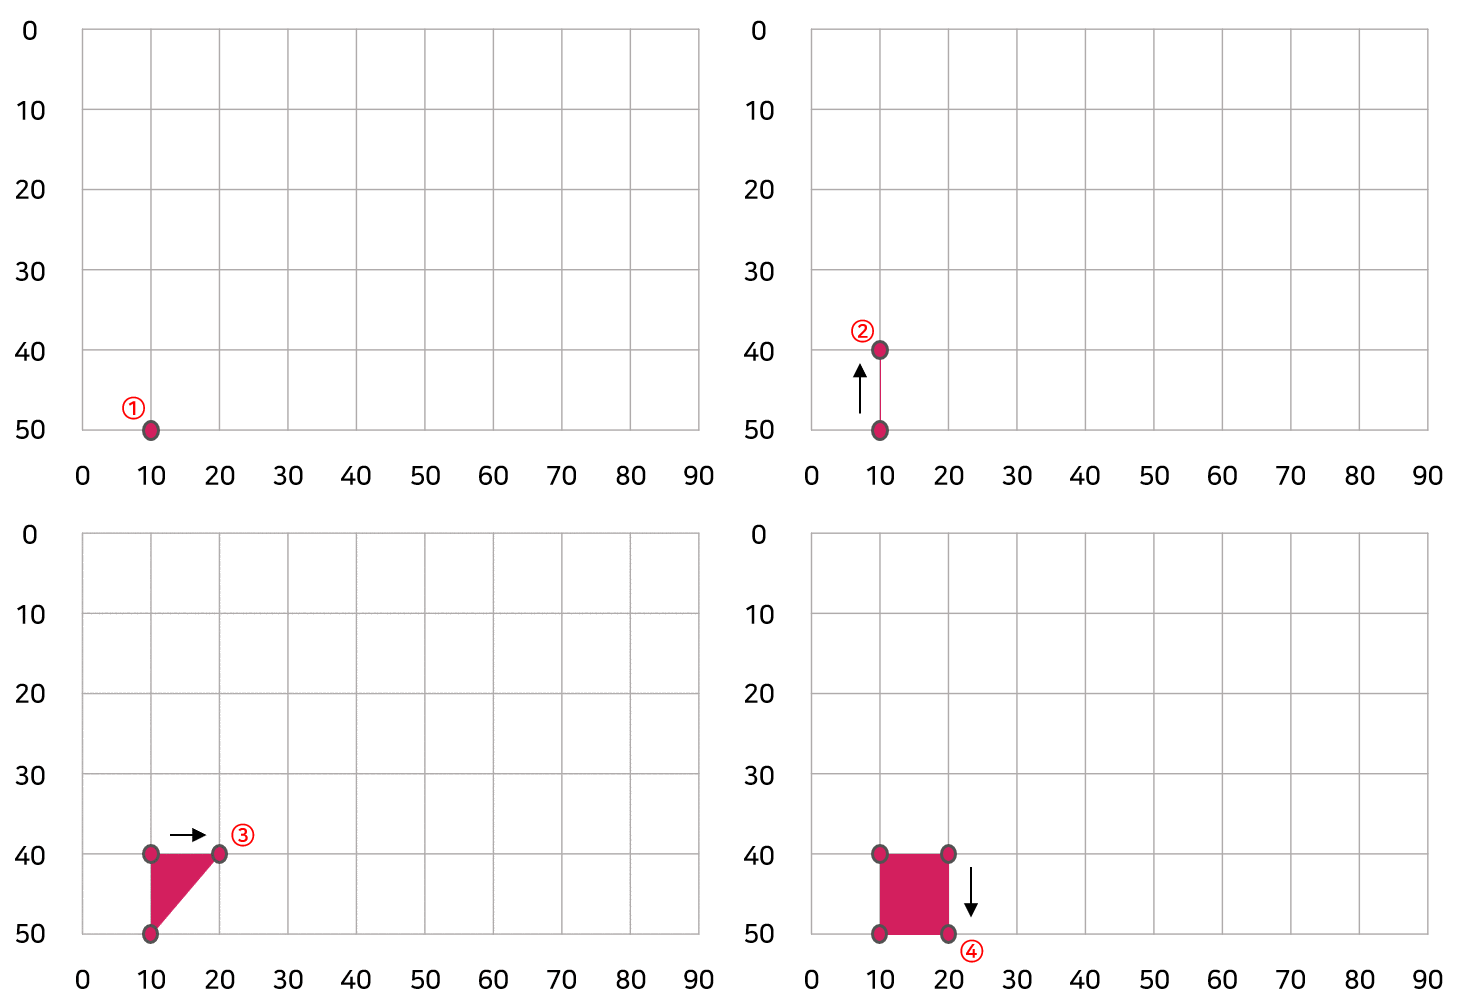
<path> 태그에 우리가 그릴 그림의 정보를 담는데요. pathData 속성에 좌표처럼 생긴 숫자 쌍들이 그림의 꼭짓점 위치입니다. 사각형을 그리기 위해 네 개의 꼭짓점이 필요합니다.
첫 점 M을 시작으로 다음 위치의 점까지 그림을 그려준다고 생각하면 되는데요. 과정을 보면 다음과 같습니다.

벡터 이미지가 그려지는 과정 여기서 주의해야 할 점은 x좌표는 왼쪽에서 오른쪽으로 읽지만 y좌표는 위에서 아래로 읽는다는 점입니다.
같은 방식으로 나머지 바를 완성해 보겠습니다.

완성된 벡터 드로어블 play_icon.xml0.00MBObject Animator는 실질적인 애니메이션 정보를 가지고 있는 xml 파일입니다.
우리는 네 개의 바를 움직여야 하므로 총 네 개의 Object Animator 파일이 필요합니다.
첫 번째 바를 움직이는 xml 파일 코드를 보겠습니다. 파일의 경로는 res/animator/ 이며, animator 폴더가 없다면 직접 디렉토리를 생성해 주면 됩니다.
<!-- res/animator/path_morph_first.xml -->
<?xml version="1.0" encoding="utf-8"?>
<set>
    <objectAnimator
        xmlns:android="http://schemas.android.com/apk/res/android"
        android:duration="1000"
        android:propertyName="pathData"
        android:valueFrom="M 10,50 L 10,40 L 20,40 L 20,50 Z"
        android:valueTo="M 10,50 L 10,20 L 20,20 L 20,50 Z"
        android:valueType="pathType"
        android:repeatCount="-1"
        android:repeatMode="reverse"/>
</set>
valueFrom, valueTo 속성으로 벡터 이미지의 시작 위치와 마지막 위치를 정의함으로써 애니메이션 효과 이전과 이후의 이미지를 설정할 수 있습니다.
뿐만 아니라, duration이나 repeatMode 같은 애니메이션의 기본 속성을 여기서 정의할 수 있습니다.
첫 번째 바의 애니메이션 과정을 프레임으로 살펴보면 다음과 같습니다. 저는 repeatMode를 reverse로 설정해 놓았기에, 다음과 같이 동작할 것입니다.

애니메이션 동작 시뮬레이션 나머지 바들의 ObjectAnimator도 완성해 보았습니다.
path_morph_first.xml0.00MBpath_morph_fourth.xml0.00MBpath_morph_second.xml0.00MBpath_morph_third.xml0.00MB이제 Animated Vector Drawable로 앞의 두 파일을 연결해주기만 하면 됩니다!
<!-- res/drawable/play_animation.xml -->
<?xml version="1.0" encoding="utf-8"?>
<animated-vector xmlns:android="http://schemas.android.com/apk/res/android"
    xmlns:tools="http://schemas.android.com/tools"
    android:drawable="@drawable/play_icon">
    <target
        android:name="first"
        android:animation="@animator/path_morph_first"/>

    <target
        android:name="second"
        android:animation="@animator/path_morph_second"/>

    <target
        android:name="third"
        android:animation="@animator/path_morph_third"/>

    <target
        android:name="fourth"
        android:animation="@animator/path_morph_fourth"/>
</animated-vector>
<animated-vector> 태그의 drawable 속성으로 위에서 정의했던 Vector Drawable 파일을 설정해주고, 바와 애니메이션을 각각 매핑시켜 주면 됩니다. 이때, 각 <target>의 name과 <path>의 name을 일치시켜야 합니다.
Java 실행 코드
ImageView playView = findViewById(R.id.play_view);

AnimatedVectorDrawable vector = (AnimatedVectorDrawable) ContextCompat.getDrawable(this, R.drawable.play_animation);
playView.setImageDrawable(vector);
vector.start();
// vector.stop();
최종적으로 ImageView에 AnimatedVectorDrawable 객체를 위처럼 처리해주면 애니메이션이 정상적으로 동작하는 걸 확인할 수 있습니다!
지금까지 AnimatedVectorDrawable로 애니메이션을 다뤄봤는데요. 확실히 프레임 방식보다 훨씬 세련된 느낌이 나지 않나요? 이를 응용해 제가 만든 음악 플레이어에 적용시켜 봤습니다.

Good! 조금의 수작업이 필요하지만 결과물의 퀄리티를 생각하면 반드시 사용해야 할 기능이 아닌가 싶습니다.
이상으로 포스팅을 마치겠습니다. 피드백은 언제나 환영입니다:) 모두 즐코하세요!
Reference
https://medium.com/@timrijckaert/play-pause-stop-animated-vector-drawable-88a9df956d20
FloatingMusicActionButton an AnimatedVectorDrawable implementation
Every time I open the PocketCast app I can’t help but repeatedly click on the play button to gaze at this wonderful animation.
medium.com
https://developer.android.com/guide/topics/graphics/drawable-animation
Animate drawable graphics | Android Developers
In some situations, images need to be animated on screen. This is useful if you want to display a custom loading animation comprised of several images, or if you want one icon to morph into another after a user's action. Android provides a couple options f
developer.android.com
댓글